Sometimes, we all need a little bit of extra space. Whether it’s for storage, to host guests, or to welcome in new family members, many of us find we outgrow our properties. While plenty of people choose to move elsewhere and to find bigger properties, it may actually make sense to stay put! While you can downsize as much as you like, you may wish to consider a house extension. Alternatively, why not think about setting up a loft conversion in an unused attic space?
LABS is well-known across South Yorkshire and beyond for damp proofing and basement renovations. However, as experienced builders and architects, we have also helped thousands of people extend their properties over the years. Extending your home may be a quick, easy and cost-effective way to get hold of the added space you sorely need. Let’s take a closer look at what’s involved.
 There are many reasons why you might want to take on house extensions. As mentioned, it may be that you need the extra space. Alternatively, you could be looking at increasing the value of your property. You may even want to modify and modernise an old property or may be looking to rent your home out to prospective new tenants. These are all great reasons to consider home extensions.
You could extend any room in your home for added convenience and space. Many people like extending their kitchens, for example. These extensions can help them turn small or cramped kitchen spaces into fully-fledged dining areas. Plenty of people also choose to extend their lounges into playrooms for young children. You may even be looking to set up a proper office while you work from home.
The possibilities really are endless. However, it’s important that you look for help from experienced contractors. LABS works with quantity surveyors on large projects, and closely with private builders for those extensions which require only a slight adjustment. What’s more, we always make sure that the extensions we build are fully approved by relevant authorities. Getting permission from local councils is crucial before any work begins!
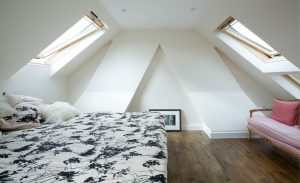
LABS is well-known for basement conversion. However, did you know that we can also help to convert spaces at the top of the house, too? Attics and lofts go unused more often than you might think. Many people use these spaces for insulation purposes, to store heavy boilers, or to simply hold random items and possessions that simply won’t fit anywhere else. I’m sure we’ve all been in a house where a loft is ‘off-limits’ thanks to storage issues up top!
However, you really don’t have to use your attic or loft as a dumping ground. With a loft conversion or extension, you could transform your space into a smart storage unit, with everything neatly organised and easy to access. That means you won’t have to fumble around in the dark in random boxes, either!
Otherwise, many people choose to convert their lofts into extra rooms. If you are growing your family or want to welcome guests to stay over, a loft room can be a fantastic addition to your existing space. Plumbing, heating and other household facilities can be easily set up in attic spaces, meaning that all you need to do is let a professional know what you’re looking for. Our team will do the rest!
Throughout all of our projects and services, we make sure to keep you and your needs at the very heart of our operations. That means you can be as hands-on or as hands-off as you like with your house extension project. We’ll welcome discussions during the design phase, and will always make sure that a project is going to plan and to your expectations. It matters to us that we get your extension or conversion set up as you expect it.
We will also help you look at new ideas and options for your home. If you’re stuck for inspiration, or want to know more about what experienced architects think, all you have to do is ask. From the very start of your project with us, we’ll invite you to sit down and have an informal chat. We can then plan out the details with you closely, ensuring we never miss a beat along the way.
LABS is here to help with basement conversions, damp control and much more. Looking for a new house extension? Thinking about pricing up a loft conversion? Turn to a local team of experts you can trust. Call us today on 0114 230 2865 or make sure to send us an email through our web form. We’ll get back in touch with you as soon as we can!
Mould is a major inconvenience, and can actually be dangerous to a tenant’s health, if left untended. In this blog post we will be discussing the different methods, and precautions you can take in order to prevent mould growth in your home. Whilst it is important to learn how to get rid of existing mould, it is just as important to understand how to prevent it from occurring in the first place.
Below we will list 5 tips that will help you to prevent mould growth from occurring in your property.
Moisture can be a nuisance, as it makes its way into properties very easily given the right conditions. Finding a way to eliminate moisture is a key step in the prevention of mould growth. It is important to check areas that could frequently collect water or have a build-up of condensation. Windows, fridges and crawl spaces are all popular places for water to build up, and it is in these environments that mould will start to form. It is therefore vital, that you take all measures possible to quickly dry any moisture in areas like these, and perform the proper maintenance, so that no further moisture is allowed to settle.

Proper ventilation of your property is also a key factor in preventing mould growth. Ventilation works to prevent humidity from gathering in the air and getting trapped in an indoor space. If left unventilated, the space will simply build up with moisture, will in turn lead to widespread mould growth. Having good airflow in essential in cutting back on the moisture level, and it will help to dry the affected areas more quickly. You can optimise the ventilation by ensuring all vents are unobstructed, as this will ensure that the air is circulating efficiently, therefore further helping to keep the spaces dry.
Mould thrives in areas of high humidity. Because humidity often causes condensation, moisture is able to settle in your property, and the dampness will take much longer to dry out, because of the wet air. If the air inside your home, is suddenly exposed to rainy and/or excessively humid conditions, there is the potential for increased mould growth. Keep an eye on moisture building up around windows, or on walls and wipe down with an absorbent cloth to prevent mould from occurring.
Condensation is a major player in the formation of mould growth, it is therefore important to also treat and prevent this from occurring.
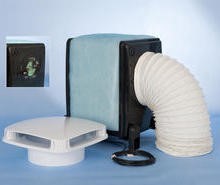
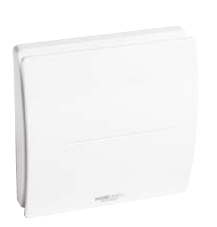
The key component to condensation in the air, is excess moisture, and so it makes sense to remove as much of it as possible in order to manage the build-up of condensation. A great way to do this is to use a positive input ventilation system, which is an energy efficient method of displacing stale contaminated air and replacing it with fresh filtered air. Fresh air is drawn from outside via the loft space through a filter on the unit and delivered into a central location in your home.
This displaces vapor-laden air, which lowers humidity levels, cures condensation and eradicates mould. The unit runs continuously except when the loft temperature rises above 25°C, when the unit will switch off. When the air temperature falls below 25°C, the unit will switch back on. For more information on these systems, see our shop page at: https://l-a-b-s.co.uk/product/positive-air-vents-heat-recovery-units/
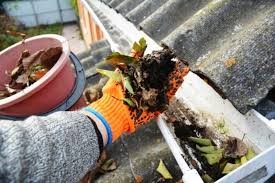
Mould problems can occur as a simple matter of a fault roof, whereby water is allowed to ingress, as a result of full or damaged gutters. It is good practice to have your gutters regularly cleaned, and inspected for damage, so that any issues can be fixed, before they become a larger issue (This is a service we can provide at LABS.) Once necessary repairs and maintenance have been carried out, it is important to keep a close look out for any water stains, that may indicate a leak.
When you first spot damp or mould in your home, it can be tempting to leave it alone. Surely it’s just a cosmetic issue – right? Sadly not. Leaving damp walls to fester for weeks and months at a time isn’t just going to encourage the problem to grow; it’s going to potentially put your health at risk!
Yes – even the smallest of damp patches, or cluster of mould spots, will need attention as soon as possible. But why is this? And just how bad are damp walls for your health – how do you know when you’ve dealt with it completely? As experts in damp proofing for homes, LABS is always here to help. For now, however, let’s take a look at wall damp in a little more detail, so we can understand fully what we’re dealing with.
 Damp walls are more than just unsightly. While you’re probably going to want to get damp and mould fixed before the problem gets any worse, there’s a chance you’re going to put you and anyone else in your home at risk. But why is this?
The answer is mould spores. Black mould spores, in particular, can thrive and grow in damp patches on all manner of surfaces in your home. Walls, in particular, are areas you should be paying close attention to. Black mould, ultimately, can prove fatal when inhaled. They are toxic to humans – which means no matter how healthy you think you are; you probably shouldn’t be taking any chances.
It’s best to get black mould attended to as soon as possible. However, there are plenty of symptoms to look out for if you’re worried that you’ve already been breathing in the spores. People who have breathed in toxic spores will have problems with breathing and even sickness. Black mould can be particularly deadly for asthma sufferers, as it can trigger attacks with very little warning.
Believe it or not, black mould can even lead to extensive illness and chronic conditions from person to person. Leaving damp walls to persist could put you and your family at risk of infection and even flu viruses. It may even lead to pneumonia if you’re not careful. If you are reasonably healthy and have a solid immune system, you probably won’t have much to worry about. However, if there are people at risk in your home, such as the very young or elderly, you are going to need to take action against damp as soon as possible.
Black mould can also cause severe lung damage over time. It can also cause a number of allergic reactions which, of course, can also prove to be deadly. Essentially, it is crucial that you identify and make arrangements for black mould to be removed safely as soon as physically possible. But how?
 You may have seen plenty of household products on the market which promise to get rid of black mould once and for all. While some of these products – such as special paint or fungal kits – can work in some circumstances, many products available off-the-shelf are not going to be able to clear black mould and other dangerous growths as efficiently as you need them to.
Therefore, you are going to need to think about using high-grade equipment and products to make sure your damp walls can be easy remedied. Black mould can be killed with the right treatment; however, you don’t have to invest a lot of money in doing so. When opting for a worthwhile solution, there may not be any need for you to vacate, or to close off your rooms. Each case is going to be slightly different – which is why the team at LABS makes sure to be as flexible as possible when consulting with our customers.
It’s perfectly possible that you can treat and remove smaller mould spots and damp patches with household products. However, with large-scale problems, or those which have already grown black mould in spades, it’s time you thought about getting in touch with an expert.
The team at LABS works with the best equipment and industrial-grade products to safely treat and destroy mould for good. Damp walls may seem impossible to cure on your own. However, we make sure to closely identify the problems you are facing and to give damp and mould conditions the push. We always ensure to use treatments which will work as quickly and as effectively as possible, and what’s more, we will never charge over the odds for our services.
Need help with damp walls or black mould? Call the LABS team today on 0114 230 2865 or get in touch with us online to book a free consultation when you’re ready.
In this blog post, we will be discussing storage basements, the science behind storage basements, the knock-on effect of saving and conserving heat, and the value that this kind of conversion might add to your property. Storage basements are a fantastic, cost-effective alternative to external storage at your property, and the conversion could raise the value by 5% to 10%!
The Science behind our storage basements
The first step of converting a basement for storage, is to achieve a reasonable head height for the client. This might include removing any existing flooring, or concrete that might already be in place. Storage basements are referred to as “Grade 2” conversions, meaning that the space doesn’t have to be habitable, but it still has to be worked to accommodate the British standard BS8102. This standard details that no water penetration is acceptable, however small damp areas are tolerated.
Regardless of this, we at LABS work to ensure that the basement doesn’t receive any damp patches after our works have been carried out. This is mostly thanks to our specialist dimpled membrane, which we fix to the walls with our sealed plugs, this is carried out in order to limit and prevent moisture. It also helps to improve airflow in the room, lessening the risk of condensation.
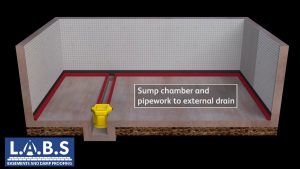
The next step is to dig out the floor (if required) to a comfortable head height for the client. This is a less rigorous dig than on a habitable basement, as there is no specific head height that we must reach to meet BS8102 requirements. Following the dig-out, we dig another 600mm deep by 600mm wide hole, where our sump pump chamber (along with the pump) can sit. This is then plumbed in to receive any water from the perimeter drainage channel, and discharge the water out of the property and away from the foundations. After the installation of the sump pump, the chamber is then concreted firmly in place. Once these steps have been completed, we install 50mm of rigid insulation over the new concrete slab and drainage channel. This will help to keep the room at a good temperature. Concrete is then poured to create a new floor, with wood around the edges, which will be removed to allow for our perimeter drainage channel.
This is then followed by the installation of the perimeter drainage channel, which sits at the bottom of the membrane inside the newly formed lanes around the edge of the room in the concrete – accepting any moisture that runs down behind the membrane. In all the corners of the drainage channel, we also install rodding eyes, so that the perimeter drainage can be maintained and tested, by our approved maintenance workers.
Bear in mind, that with a storage basement it is down to the customer to decide which parts of the conversion they would like. Some people, for example, might choose to leave out steps, such as the digging out of the old concrete slab, and installation of a new one.
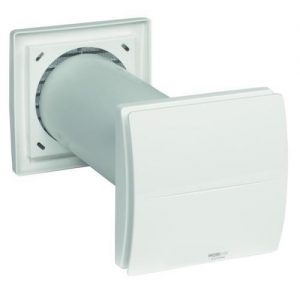
Heat Recovery Ventilator Unit
The heat recovery units for single rooms have been specifically designed to eliminate excessive moisture and help to prevent condensation. This eliminates risks to property and health whilst retaining up to 80% of heat contained within the outgoing air. We tend to install these on the majority of our storage basements, as they are a very cost-effective way of mitigating the risk of condensation and eliminating any excess moisture in the air, which could lead to damp problems, or even mould growth.
Cost effectiveness
A storage basement is a more cost-effective way of damp proofing your basement space, rather than going for the more expensive Grade 3 habitable space.
Storage basements are also an efficient way to save money on external storage. A quick search for external storage solutions, showed that the average price for a mere 4 square meters of storage space, costs around £50 per week! Meaning that somebody who intends to store things all year round might pay £2600 for a unit, where they might be able to convert their unused basement space for just over double this. Our storage basements are also guaranteed for 20 years, so if a part of the system was to fail, the replacement would be free.
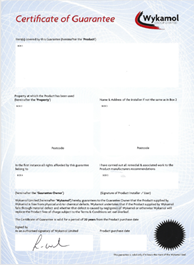
Certificate of Guarantee
LABS as a Wykamol Approved Contractor offers Certificates of Guarantee on all of our storage basement conversions, in order to give the customer peace of mind. With one of these guarantees, the works that we have undertaken will be guaranteed for 25 years, and as such if any of our systems have any issues, we will make time to come and service the system.
Call LABS Building Services today on 0114 2302865 for any basement enquiries, or to book yourself in for a free survey!
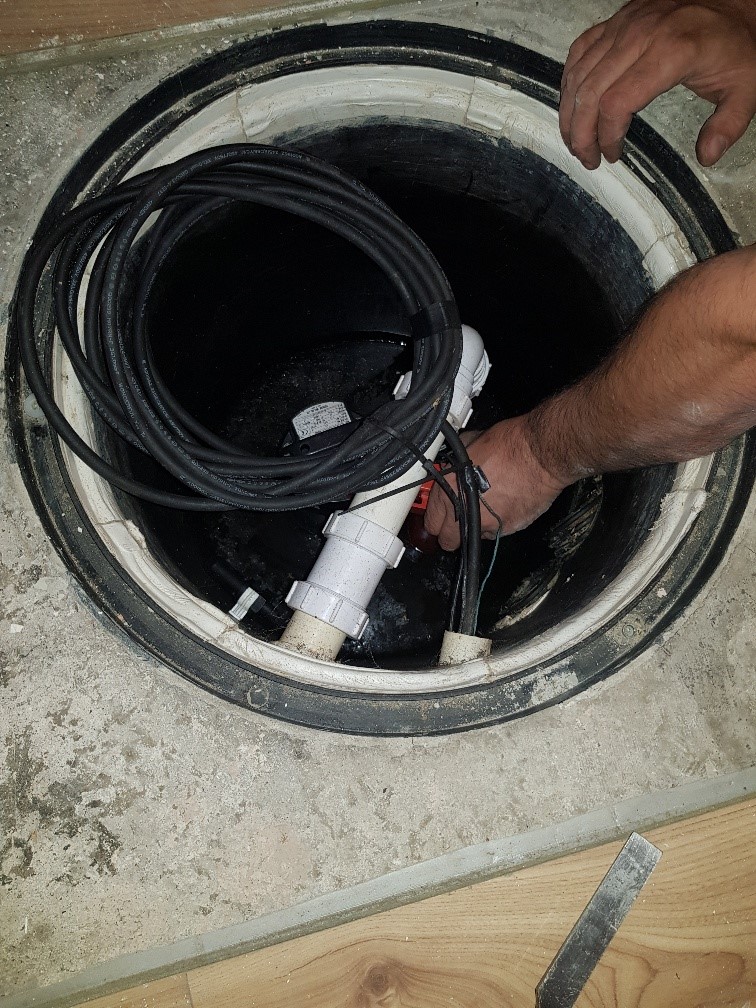 A sump pump is a major component in any home that is at risk to water ingress or flooding, it is essential in many basements in order to help rainwater/groundwater from entering. Any excess water that might have pooled up, under or around your home, will drain into a sump pump pit, which is then pumped away from the home and foundations. Just like most other appliances that might be found in your home, a sump pump needs regular maintenance in order to keep it functioning efficiently. Throughout this article we will be giving some fundamental tips which will help to ensure that your sump pump continues to function to its maximum ability.
It is important to be consistent with the maintenance for your pump, in order to minimise the chance of your home flooding. It is advisable to call out a professional in order to do this maintenance, but there are some simple steps you can take to improve the systems functionality.
• Flush the system with water three to four times a year, in order to remove any debris and residue that might have built up.
• Make sure that the float is unobstructed and can move smoothly without resistance (otherwise it may fail to activate when the water level gets too high).
• Visually scan the pit, and remove any debris, stones or mud.
• Test the pump by slowly pouring a bucket of water into the system, and ensure that the float rises alongside the water level, triggering the pump to start discharging.
• Water should be discharging away from the buildings and its foundations.
• It is advisable to disconnect the pump from the power source, and remove the unit.
• You should also replace the backup battery every two to three years.
With there being a variety of different sump pump systems, it is often a good idea to consult your manual for the manufacturer’s instructions on maintenance and schedules. However, it is advisable to follow the following schedule for maintenance:
• Monthly: If your sump pump is connected to, and disposing of water from a basement regularly, a monthly cleaning out of the pump screen and inlet is advisable. You should disconnect the pump from the power supply before cleaning, and ensure its plugged back in once completed.
• Quarterly: If your sump doesn’t dispose of water regularly, then the screen could be cleaned every-one, to three months.
• Annually: You should remove the sump pump, and clean both the pump and kit, at least once a year to ensure its functioning effectively and efficiently.
A professional inspection of your sump pump system annually will help to ensure that it is working properly, and also prolong the pumps lifespan in the long run. Contact LABS Basements and Damp Proofing, for further info on getting a service booked in.
If any of these problems occur, it is important for you to call a professional to come out and look at the system. Damage that can be done by a failed pump, could cost ten times as much as it would have been to fix the system earlier in its life cycle, therefore it is very important that you keep an eye out for any of the issues arising, and contact a professional to come and fix it sooner rather than later. Here are some of the issues that could arise:
• Power failures! If your power goes out, the pump system is completely useless and could flood when the sump reaches capacity.
• The sump becoming overwhelmed, it is important to select a pump system that will fit your requirement for water discharge. Selecting a cheap pump, with low capacity, might only lead to further costs if the pump is unable to keep up with the amount of water it has to discharge, and could even flood.
• A stuck sump pump switch
• Water freezing during cold periods, can cause blockages to the system, which would result in a flood if the issue is left unattended.
• Old age, the life cycle of a pump is around five to seven years, and it is advisable to replace them in this time frame to ensure that the system works to its maximum efficiency. An older pump might even fail without warning, which could result in a flood.
If you’re running in to any of these issues, or think you might have a problem with your sump pump, then the experts at LABS are on call! We’re here to give you our expert opinion, no sales pitch. Call LABS Building Services today on 0114 2302865 for any issues relating to your pump system or plumbing.

In this post, we will be discussing one of the most common and unwanted forms of damp that might affect your property. Condensation damp tends to occur when there is a high level of relative humidity, which can be caused by many factors including cooking in an improperly ventilated area, drying clothes indoors with inadequate airflow and even changes in temperature. Due to the large range of possible causes, it is important that you employ a specialist surveyor when attempting to tackle any issues with condensation, to ensure that the works carried out will be sufficiently thorough in preventing further condensation damp.
Condensation occurs when matter changes from a gas into a liquid, we tend to see this in properties when warm air hits a pocket of cooler air, or when warm air comes in to contact with a cold surface. Warm air tends to hold a greater volume of moisture than cold air does, and as such when it comes in to contact with colder surfaces it releases some of that moisture, this is when condensation occurs.
Colder surfaces tend to be those nearest to windows, externally facing walls, and a build-up of moisture in these areas can be a particularly unpleasant situation. Many homeowners are unaware that they are contributing to their condensation problem by simply going about their lives in their home, and because of this, condensation is one the leading causes of damp Different Types of Damp in UK homes.
Whilst many simply see condensation as a minor inconvenience, it can soon evolve into a larger issue. If left untreated, condensation tends to lead to mould growth in the affected areas. It is not unheard of for mould growth to penetrate walls and recede into cavities, which if left for a long period of time, can cause structural damage. Whilst that is a worst-case scenario, it is also not uncommon for paint work to start to peel, and for paperwork to start to bubble up, eventually leading to further costs, which will continue to occur if the root cause is left untreated.
Condensation can also lead to damaged personal items and furnishing if left untreated. Mould can, and will grow on practically anything and once it has a foothold it can be very difficult to eradicate. Musty, stagnant smells will continue to linger long after the visible signs have been treated, leaving you with little option but to get rid of the affected item.
The mould itself can also cause health issues, as the spores are airborne and thus inhaled by any occupant of the room. People who suffer from asthma, bronchitis and even tonsillitis, can have their issues triggered when living in a damp, mould infested environment. It is even possible for the damp to a be a cause of skin issues such as eczema and hives. People with weak immune systems will have a hard time fighting off the adverse effects of mould spores in the air, but even those with minimal health issues should seek to address any condensation issues immediately.
Now that we have discussed the causes and issues that condensation can cause, we will take a look at how you can prevent it. As we touched on earlier in the post, condensation can be caused by excess moisture lingering in the air, so controlling this will be our objective. The key to eliminating moisture in the air is to be consistent in your anti-condensation routine, especially during the colder months.
The windows in your home will more than likely be the first visible indicator of condensation, and they are a good place to start. Whilst this is not technically a preventative measure, it will help to remove some of the moisture from the room, and be effective in helping to prevent mould growth. This should ideally be done every day, first thing in the morning. You can use a kitchen towel or other absorbent cloth to gently wipe away any liquid that has formed on the windowpanes, you should ensure they are as dry as possible.
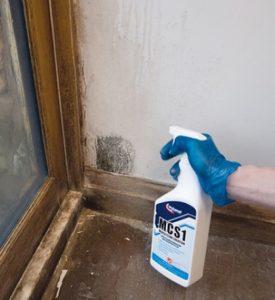
If mould has started to form you can use a hot soapy cloth to wash down the affected area, which should be disposed of immediately as to not spread spores. The window can then be dried with a separate cloth. It is not advised to brush the area down, as you risk spreading mould spores around your home. Luckily, at LABS we stock a specialist mould eradication kit, which includes a bottle of MCS1 (also sold separately), which works to combat the spread of mould by killing any spores or growths that might have occurred. You can find it in our online shop at https://l-a-b-s.co.uk/product/no-more-damp-mould-treatments/
It is a good idea to set your thermostat, to a low even temperature in order to prevent cold spots from occurring. With fewer cold spots, there will be less of an opportunity for the condensation to form. If the problem is particularly bad, it would be wise to keep the heating on all day, even when you’re not at home in order to keep the condensation at bay.
It is very common for newer windows to already have “trickle vents” installed, however, the majority of older properties will have to be ventilated in order to manage the condensation problem. The recommended process is to ventilate a space in 15 minute periods, for example, when you wake up in the morning, during the process of wiping down your windows, you could open any doors and other windows in order to allow any moisture that has built up overnight, to escape. This will cause the relative humidity of the space to steadily decrease.
It is also important to ventilate whilst you cook or dry clothes, as both of these activities have the potential to create a lot of moisture in the air. It is as simple as opening windows and doors in the space that you intend to do these activities so moisture can escape. Should these preventative measures fail, we can move on to things like installing more air bricks or vents in the property. Positive Input Ventilation is also a great option, which we will discuss later.
In addition to the preventative measures mentioned before it is also advisable to keep items such as sofas, drawers, wardrobes, and cabinets, etc. slightly away from the walls so that air is allowed to circulate behind them. A 5cm gap should be sufficient. It is also advised that you keep furniture away from the external walls altogether if possible. External walls will naturally be cooler than the internal walls, hence allowing for condensation to arise easier.
The proper installation of insulation can make a huge difference to the levels of the condensation in your home, especially if cavity walls are present. Another important factor in managing the condensation is the loft insulation and double-glazed windows, both of which will help you maintain a constant temperature throughout your home when installing properly.
The key component to condensation in the air, is excess moisture, therefore it makes sense to remove as much of it as possible in order to manage the build-up of condensation. A great way to do this is to use a positive input ventilation system, which is an energy efficient method of displacing stale contaminated air and replacing it with fresh filtered air. Fresh air is drawn from outside via the loft space through a filter on the unit and delivered into a central location in your home.
This displaces vapor-laden air, which lowers humidity levels, cures condensation and eradicates mould. The unit runs continuously except when the loft temperature rises above 25°C when the unit will switch off. This is as the hot incoming air would be uncomfortable. When the air temperature falls below 25°C, the unit will switch back on. For more information on these systems, see our shop page at: https://l-a-b-s.co.uk/product/positive-air-vents-heat-recovery-units/

If you know someone with a condensation problem, or if you are a landlord and wish to make your tenant aware of how important it is to prevent condensation build-up, feel free to share this blogpost with them. Or for any other property advice, please give us a call on 0114 2302865 and we will be happy to help!
For more, see our 5 Top Tips for Cellar Conversion
If you are thinking of making use of the basement space below your home in Sheffield with a conversion, then LABS Basements and Damp Proofing has provided this blog to offer up some key things to consider. Here we will walk you through the key things you need to know before you embark on your basement conversion. We will be going over the practicalities of basement conversion, the British Standard (BS8102) concerning basement conversion, and building regulations. We will also explore examples of works we have undertaken, and the property value increases you can expect after converting a basement.
One of the essential things to consider when undertaking a basement conversion, is the building regulations that you must comply with in order for the space to be legally habitable. The code of practice (BS8102) for protection of below ground structures against water from the ground’ outlines the industry recognised best practices for dealing with and preventing the ingress of water.
BS8102 Covers:
BS8102 also provides guidelines for the evaluation of groundwater conditions, risk assessments, and the options that are available to you in regard to the drainage of water outside the structure.
There are also a number of regulations you must take in to consideration if you wish for your converted basement space to be legally habitable, these are things such as:
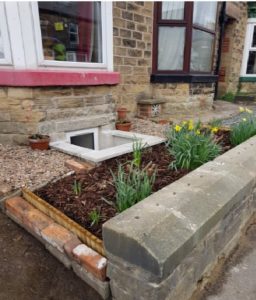
There are two different methods of converting a basement space, and these will differ slightly in specification and cost, depending on what you intend to use the basement for. The most cost-effective means of basement conversion would be to build a simple utility room with no windows. You could use this for a number of things, such as: a workshop, a wine cellar, storage or even to grow plants indoors. With a little extra funding and work put in to electrical and plumbing works, you could upgrade the space to be used as a personal gym, or games room.
If you intend for the basement conversion to be used as a habitable space, such as an office, kitchen or bedroom, then you will have to include a lightwell. A lightwell is key for creating a quality habitable basement conversion, and should be built in a way that maximises the amount of daylight received.
Some ways to maximise light are:

There is a lot to consider when undertaking a basement conversion. Below we will outline some of the things that we at LABS, think is important to keep in mind.
Contact us today on 01142 302865 or visit our website @ www.l-a-b-s.co.uk for more information.
We at LABS basements and damp proofing would like to share some of our top tips on how to spot damp walls, and the different types of damp that could be present.
Rising damp is perhaps the most commonly known form of damp that might affect your home. It tends to occur in older buildings, with no adequate damp proof course (DPC), when groundwater rises up through porous materials, such as the bricks and mortar that make up your walls.
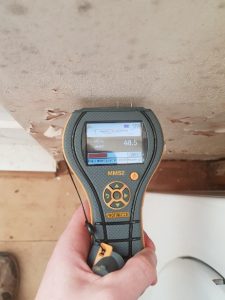
A common signature of rising damp is a clearly defined band of dampness, starting at your floor and moving upwards, this will often cause your paint to start flaking, or wallpaper to peel. Damp walls that are caused by rising damp can also result in other symptoms such as:
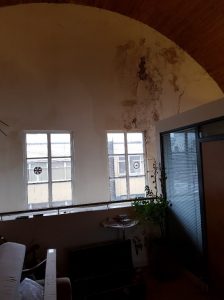
These pictures show typical signs of rising damp and damp walls. The picture on the left picture shows moisture readings indicative of rising damp, along with visual signs such as the blistered plaster work. The picture on the right shows what a wall affected by rising damp might look like.
Penetrating damp occurs when water manages to find its way inside a property from the exterior. This can happen in a number of ways, such as ingressing through walls, windows, and door fittings. penetrating damp is more likely to arise as a problem in older properties, or those located by the sea or in open areas that are open to the elements. It is key to identify penetrating damp as quickly as possible otherwise it may evolve in to a larger issue, such as a rot infestation, or contaminated plaster.
Whilst some of the symptoms of penetrating damp, are similar to those of rising damp, the key differential between the two is usually found in the structural factors. Penetrating damp tends to occur as a result of structural issues, such as a failing guttering system, faulty roofing, or cracks and holes in external walls. Penetrating damp is one of the most common causes of damp walls.
These are some telling signs of penetrating damp
Importantly dampness around the chimney can be often misdiagnosed as a problem with the chimney stack. More often than not this problem can be attributed to the fossil fuel residue left by coal, coal contains salt minerals such as nitrates, chlorides and sulphates that can migrate from the brick work through to the plaster finish. When in the plaster finish, these salts draw moisture from the environment to them and will show up with wet patches with no uniformity in presentation.
The problems with damp chimney walls are alleviated in a similar fashion to other damp problems. chimneys are also prone to other causes of dampness, such as; open or broken chimney pots, poorly-constructed chimney stack/lead fleshing, ventilation and cracked mortar around the chimney stack. It is important to note that rising damp can also lead to chimney damp if left untreated.
Here are some ways to tell if you have a chimney damp problem, and these can be at any section of the chimney breast throughout a given property.

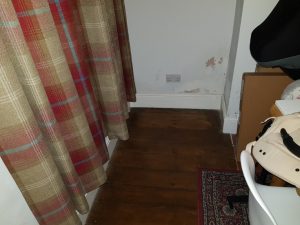
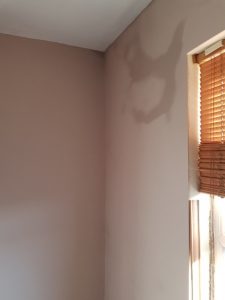
This picture shows a clear damp patch just below the dado decorative rail.
TYPES OF DAMP
Rising damp, penetrating damp, and condensation are the three most common types of damp that can affect your home. A less widely known type of damp is that from salt contaminates. Each type of damp needs to be treated in different ways, and the costs can vary dramatically, so it’s important to know what type of damp is affecting your home before you try to get it fixed. Please contact LABS LTD to help you identify which type of damp, and the most appropriate remedial action to take. You can also click on our shop tab
https://l-a-b-s.co.uk/shop/ and purchase items directly. All orders received by 12noon can be dispatched for next day delivery.
Rising Damp
The process of hydrostatic water pressure traveling via hydroscopic capillaries in building substrate is what we commonly refer to as the process of rising damp. Most walls and floors allow some water in, but it’s usually stopped from causing damage by a barrier called a damp-proof course or damp-proof membrane.
Penetrating Damp
Penetrating damp is caused by water leaking through walls. This type of damp may expand across your walls or ceiling, but this will be horizontal movement rather than by travelling up walls (as is the case with rising damp). Caused either by the lack of an escape route for moisture entering the structure, or an increase in moisture that overloads the escape route.
Condensation – Damp from the air
Caused by warm air containing water vapour being cooled. The air can either be cooled on contact with a cooler surface, or lose heat in cooler surroundings. As the air cools, it can no longer hold as much water vapour and any excess leaves the air as water droplets.
Chemical Damp – Damp from salt contamination
Caused by contamination of the plaster with hygroscopic salts. The salts absorb moisture direct from the air. Contamination can have occurred when the house was built, or have happened at any time since for a variety of reasons. Very common on chimney breasts due salts remaining in the flue shaft from fuel products such as coal. These salts then migrate through the building substrate over time and draw moisture to the area.
[fl_builder_insert_layout slug=”6-questions-basements-lead-magnet-promo”]